


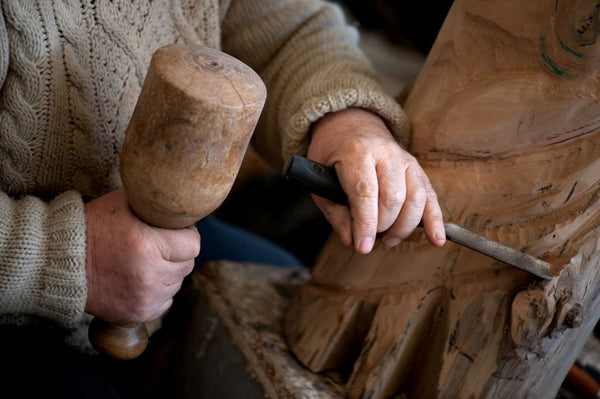
From log to artwork: transforming raw wood using chisels and gouges
From log to artwork: transforming raw wood using chisels and gouges
Masterpiece in every grain
The art of selecting wood

Precision begins with chisels
1. Bench chisels
2. Mortise chisels
3. Skew chisels
4. Gouges
The dance of wood and tool
The initial sketch
Marking and measuring
Chisel in hand
The finishing touch
The woodworker's passion
Understanding raw wood
Types of wood for carving
1. Softwood vs. hardwood
Softwood:
- Softwood, derived from coniferous trees like pine and cedar, is known for its ease of carving.
- It is softer, lighter, and more forgiving, making it ideal for beginners.
- Softwood is excellent for intricate designs and delicate details.
Hardwood:
- Hardwood, sourced from deciduous trees such as oak, cherry, and walnut, is denser and more challenging to carve.
- It offers exceptional durability and a polished finish, making it perfect for detailed, long-lasting pieces.
- Experienced carvers often prefer hardwood for its versatility and exquisite results.
2. Grain patterns
Straight grain:
- Wood with a straight grain pattern is relatively easy to carve.
- It allows for smooth cuts and is excellent for projects requiring precision.
Interlocking grain:
- Interlocking grain patterns can be more challenging to work with.
- The wood fibers intersect at various angles, making it necessary to adjust carving techniques.
Irregular grain:
- Wood with irregular grain patterns can be unpredictable.
- Carvers must adapt their approach to accommodate the wood's unique characteristics.
Sourcing quality wood
-
Visit local wood suppliers: Local suppliers often offer a variety of wood species suitable for carving. Visiting their stores allows you to inspect the wood's quality and grain patterns in person.
-
Online suppliers: Numerous online suppliers specialize in providing wood for carving. Read customer reviews and product descriptions carefully to ensure you're getting the right wood for your project.
-
Sustainability: Consider purchasing wood from sustainable sources to promote responsible forestry practices.
Preparing the wood blank
1. Roughing out the shape
2. Marking guidelines
Essential tools and materials
Chisels
1. Types of chisels
Bench chisels
- Bench chisels are the workhorses of woodworking. They come in various sizes, with a beveled edge that allows for versatility in tasks such as paring, chopping, and even intricate carving.
Mortise chisels
- Mortise chisels have thick, sturdy blades, making them ideal for creating mortise and tenon joints. They can withstand the force of a mallet, ensuring the durability of your joints.
Skew chisels
- Skew chisels feature angled blades, perfect for creating clean, smooth surfaces and precise cuts. They excel in intricate detailing and shaping.
2. Choosing the right chisel
-
Task specificity: Determine the specific tasks you'll be performing. Different chisels excel in various jobs, so match the chisel to the task.
-
Size matters: Choose the chisel size that aligns with your project. Smaller chisels are ideal for delicate work, while larger ones handle more substantial tasks.
Gouges
1. Types of gouges
Straight gouges
- Straight gouges have flat, straight blades and are suitable for general carving tasks.
Veiner gouges
- Veiner gouges have a U-shaped profile and are ideal for creating deep, narrow channels and fine details.
2. Selecting the perfect gouge
-
Detail level: Consider the level of detail your project requires. Fine details demand veiner gouges, while straight gouges work well for broader, less detailed areas.
-
Curvature: Pay attention to the curvature of the gouge's blade. A shallower curvature is suitable for flat surfaces, while a deeper curve is ideal for concave areas.
Other necessary tools
1. Mallet
2. Sharpening stones
3. Safety gear
- Safety glasses: Protect your eyes from flying wood chips and debris.
- Hearing protection: Woodworking can be noisy; earmuffs or earplugs are essential.
- Dust mask or respirator: Wood dust can be harmful when inhaled, so wear appropriate respiratory protection.
Sharpening your tools
Importance of sharp blades
1. Precision and accuracy
2. Safety
3. Efficiency
4. Quality of finish
Step-by-step sharpening guide
1. Gather your sharpening equipment
- Sharpening stones: Choose stones with varying grits, from coarse to fine.
- Honing guide: A guide that helps maintain the correct sharpening angle.
- Lubricant: Water or honing oil to lubricate the stones.
2. Prepare your workspace
3. Secure the blade
4. Start with coarse grit
5. Progress to finer grits
6. Hone the edge
7. Check the edge
Maintaining sharpness
-
Regular inspection: Frequently inspect your tools for dullness. It's easier to maintain a slightly dull edge than to start from a completely blunted state.
-
Honing vs. sharpening: Regular honing (using a honing guide and fine stone) helps maintain sharpness between full sharpening sessions.
-
Clean after use: Clean your tools after use to prevent buildup that can dull the blade.
-
Protective storage: Store your tools in a way that prevents contact with other metal objects that could cause nicks or dulling.
Techniques for woodcarving
Chip carving
1. Basics of chip carving
-
Tools: Chip carving typically requires a chip carving knife with a short, sharp blade. This knife excels at creating precise cuts.
-
Design: Begin with a simple design on your wood surface. Traditional chip carving patterns often involve triangles, diamonds, and squares.
-
Technique: Hold your chip carving knife at a low angle to the wood surface and push it forward to make small chips. Vary the angle and depth to create patterns and textures.
2. Creating geometric patterns
-
Practice precision: Achieving sharp, clean angles and straight lines is essential in chip carving. Practice on scrap wood to improve your precision.
-
Experiment with depth: Vary the depth of your cuts to create shadows and depth within your patterns.
-
Complementary designs: Combine different geometric shapes to create intricate and visually appealing designs.
Relief carving
1. Carving in three dimensions
-
Tools: Relief carving requires a broader range of tools, including gouges, chisels, and mallets.
-
Design: Start with a design that features elements of varying depth, such as a flower or a face.
-
Technique: Use gouges and chisels to carve away the background wood, leaving the raised design intact. Work gradually, starting from the background and moving toward the foreground.
2. Adding depth and texture
-
Graduated depths: Create a sense of depth by carving the background at different levels, with deeper areas further from the raised design.
-
Texture tools: Experiment with textured gouges and chisels to add intricate details, such as wood grain or fabric folds.
-
Shading: Enhance your relief carving with subtle shading techniques, using the direction of your cuts to suggest shadows.
Sculptural carving
1. Carving freestanding sculptures
-
Tools: For sculptural carving, you'll need a wide range of tools, including gouges, chisels, and saws, to shape the wood in three dimensions.
-
Design: Begin with a clear concept of your sculpture. It could be an abstract form, a figurative piece, or anything that sparks your creativity.
-
Technique: Carve away the excess wood to reveal the shape of your sculpture. Pay attention to the contours and details, constantly refining your work.
2. Expressive carving styles
-
Abstract: Create non-representational forms that convey emotion and abstract concepts.
-
Figurative: Craft lifelike figures or animals, paying attention to proportions and anatomical details.
-
Textured: Experiment with textures and surfaces to add character and depth to your sculptures.
Designing your artwork
Sketching your vision
1. The power of a sketch
-
Start simple: Begin with a rough outline of your concept. Don't worry about perfect lines at this stage; focus on capturing the essence of your vision.
-
Dimensions and proportions: Pay attention to dimensions and proportions. Ensure that the size and scale align with your intended purpose, whether it's a small decorative piece or a large furniture item.
-
Iterate and refine: Sketching is an iterative process. Don't be afraid to refine your sketches, making adjustments until your vision feels just right.
Incorporating traditional and modern styles
1. Embracing tradition
-
Research: Study traditional woodworking styles, such as Shaker, Arts and Crafts, or Chippendale. Understand their key characteristics, joinery techniques, and ornamentation.
-
Materials: Traditional woodworking often emphasizes the use of specific wood species. Select wood types that align with the style you're embracing.
-
Joinery: Incorporate traditional joinery methods that were popular during the era of your chosen style. This can include dovetail joints, mortise and tenon joints, and more.
2. Embracing modernity
-
Simplicity: Modern design often emphasizes clean lines, simplicity, and minimalism. Consider how you can simplify complex traditional designs for a contemporary aesthetic.
-
Materials and finishes: Experiment with modern materials and finishes that weren't available in traditional woodworking, such as acrylics, resins, or metal accents.
-
Functionality: Prioritize functionality and practicality in your design, catering to the needs of the modern user.
Balancing details and simplicity
-
Focal points: Identify focal points in your design where intricate details can shine. This might be an ornate carving on a chair's backrest or an elaborate inlay on a tabletop.
-
Negative space: Embrace negative space. Sometimes, simplicity can be achieved by leaving areas untouched, allowing the wood's natural beauty to stand out.
-
User experience: Consider how your design will be used. Simplicity can enhance usability, making a piece more practical and user-friendly.
-
Edit ruthlessly: Be willing to edit your design. Sometimes, less is more. Removing extraneous details can make the essential elements of your design shine.
Getting started with your chisel
Holding and gripping techniques
1. The right grip
-
Firm but gentle: Hold the chisel firmly but without excessive force. Squeezing too tightly can lead to fatigue and less control over the tool.
-
Dominant hand: Your dominant hand should grip the handle near the end for better control and power.
-
Guide hand: Use your non-dominant hand to guide the chisel, placing it closer to the blade for stability. Your fingers should be out of the cutting path.
-
Choke up when needed: For delicate work, you can choke up on the handle to increase precision.
2. Bevel orientation
-
Bevel down: For most tasks, the bevel should be facing down, with the flat side of the chisel against the wood. This allows for better control and prevents the tool from digging too deeply.
-
Bevel up (rarely): In certain situations, such as when pairing end grain, you may use a bevel-up technique.
Safety measures
1. Protective gear
-
Safety glasses: Protect your eyes from flying wood chips and debris.
-
Hearing protection: Woodworking can be noisy; earmuffs or earplugs are essential.
-
Dust mask or respirator: Wood dust can be harmful when inhaled, so wear appropriate respiratory protection.
-
Gloves: While not always necessary, gloves can provide added grip and protection.
2. Workbench setup
-
Secure the wood: Ensure the wood you're working on is securely clamped to the workbench. This prevents movement and potential accidents.
-
Stable base: Make sure your workbench is stable and doesn't wobble during use.
-
Good lighting: Adequate lighting helps you see your work clearly and prevents accidents.
Beginning your first cuts
1. Marking your cut
-
Use a pencil, marking knife, or marking gauge to create a clear guideline.
-
Double-check your marks to ensure accuracy, especially for intricate or precise cuts.
2. Controlled strikes
-
Position the chisel on the marked line, ensuring the bevel is facing down.
-
Use a mallet or hammer to deliver controlled strikes to the chisel's handle. Start gently and increase force as needed.
-
Focus on accuracy and control rather than power. Let the chisel do the work.
-
Keep your non-dominant hand well away from the cutting path.
-
Work incrementally, removing small amounts of wood with each pass until you achieve your desired depth or shape.
The art of gouging
Mastering gouge movements
1. Proper hand position
-
Dominant hand: Hold the gouge handle with your dominant hand, gripping it firmly but not too tightly.
-
Guide hand: Use your non-dominant hand to guide and support the gouge. Place it on the tool's shaft or hold the wood near the cutting area.
2. The cutting stroke
-
Push cut: For a push cut, push the gouge forward through the wood while keeping it in contact with the surface. This technique is ideal for creating straight or curved lines.
-
Paring cut: For a paring cut, hold the gouge at a slight angle to the wood and gently slice away thin layers. This technique is useful for creating smooth surfaces and detailing.
-
Stop cut: A stop cut is used to define the edges of a design. Make a shallow cut perpendicular to the wood's surface to create a boundary for your gouging work.
3. Controlling depth
-
Controlled pressure: Apply even, controlled pressure to the gouge while cutting. Avoid excessive force, as it can lead to gouging too deeply.
-
Gradual progression: Work in small increments, gradually increasing the depth of your cuts as needed. This approach ensures precision and prevents over-carving.
Creating intricate patterns
1. Planning your design
-
Design blueprint: Start with a clear design plan. Sketch your design on the wood or create a reference template.
-
Understanding grain: Consider the direction of the wood grain in your design. Gouging against the grain can result in tear-out, so plan your cuts accordingly.
2. Varying gouge profiles
-
Gouge selection: Choose gouges with the appropriate profiles for your design. Different gouge shapes, such as U-gouges, V-gouges, and spoon gouges, offer versatility in creating patterns.
-
Be mindful of depth: Pay attention to the depth and angle of your gouge cuts to achieve the desired pattern and texture.
3. Experimentation
-
Test on scrap wood: Experiment with your gouge on a piece of scrap wood to get a feel for the tool's behavior and how it interacts with the wood grain.
-
Gradual progression: Start with simpler patterns and gradually tackle more complex designs as your skills improve.
Smoothing and refining
1. Fine gouges
- Transition to fine gouges: Switch to finer gouges to refine the details and smooth any rough areas in your design.
2. Sanding
-
Sandpaper selection: Choose appropriate grit sandpaper to further refine the surface. Start with coarse grit and gradually move to finer grits.
-
Light pressure: Sand with light pressure to avoid altering the patterns you've created.
3. Finish and protect
-
Finishing: Apply a wood finish or sealant to enhance the wood's natural beauty and protect your work.
-
Maintenance: Regularly maintain your gouges by sharpening them to keep them in optimal condition.
Adding finishing touches
Sanding your woodwork
1. The importance of sanding
-
Start coarse, finish fine: Begin with coarse-grit sandpaper (such as 80-100 grit) to remove any imperfections, like tool marks or rough spots. Gradually progress to finer grits (150-220 grit) for a smoother finish.
-
Consistent direction: Sand in the direction of the wood grain to avoid creating scratches or uneven spots.
-
Sanding blocks: Consider using sanding blocks or holders to maintain even pressure and achieve uniform results.
2. Inspecting your work
-
Well-lit environment: Inspect your woodwork under good lighting to identify any areas that may need additional sanding.
-
Tactile inspection: Run your hand over the surface to detect any roughness or inconsistencies that may not be visible.
-
Attention to detail: Pay close attention to edges, corners, and intricate details, as they may require extra care during sanding.
Choosing the right finish
1. Types of finishes
-
Oil-based finishes: These finishes, like tung oil or linseed oil, provide a warm, natural look and are relatively easy to apply.
-
Water-based finishes: They offer low odor, quick drying times, and can be used on a variety of wood types. Polyurethane and acrylic varnishes fall into this category.
-
Shellac: Shellac offers a glossy finish and is often used for decorative pieces.
-
Wax: Wax finishes provide a soft, matte sheen and are often used for antiques and fine furniture.
2. Considerations for choosing
-
Durability: Consider how much wear and tear your woodwork will endure. For high-traffic items, choose a durable finish like polyurethane.
-
Aesthetics: Think about the appearance you want to achieve. Some finishes enhance the wood's natural color, while others provide a different hue or shine.
-
Application ease: Some finishes are easier to apply for beginners, while others may require more experience and skill.
Applying a protective coating
1. Preparation
-
Clean the surface: Ensure the wood surface is clean and free of dust and debris. Use a tack cloth or a damp cloth for this purpose.
-
Ventilation: Work in a well-ventilated area to prevent inhaling fumes from certain finishes.
2. Applying the finish
-
Brushes, cloth, or spray: Depending on the finish type, use an appropriate application method. Brushes, lint-free cloths, and spray equipment are common choices.
-
Thin coats: Apply thin, even coats of finish, allowing each coat to dry completely before adding the next. Follow the manufacturer's instructions for drying times.
-
Sand between coats: For a smoother finish, lightly sand the wood between coats with fine-grit sandpaper and remove dust before applying the next coat.
3. Final inspection
-
Final check: Inspect the finished woodwork for any imperfections or dust particles that may have settled into the finish. These can often be removed with light sanding and a final coat.
-
Curing time: Allow the finish to cure completely according to the manufacturer's recommendations before handling or using the woodwork.
Frequently Asked Questions
A. What wood types are best for beginners?
-
Pine: Softwood like pine is readily available, affordable, and easy to carve, making it an excellent choice for beginners.
-
Basswood: Known as the carver's wood, basswood is soft and light, making it perfect for intricate carving projects.
-
Cedar: Cedar is both aromatic and soft, making it pleasant to work with, especially for carving decorative items.
-
Redwood: Redwood is another softwood option that carves well and has a distinctive color and grain pattern.
B. How do I prevent my chisels from getting dull?
-
Regular sharpening: Sharpen your chisels regularly using sharpening stones or honing guides. A sharp chisel is safer and more effective.
-
Proper storage: Store your chisels in a way that prevents them from banging into each other or other hard objects. Use blade guards or a chisel rack.
-
Keep them clean: Remove wood residues and sap from your chisels after each use. Residues can cause rust and dulling.
-
Use a mallet, not a hammer: When striking your chisels, use a wooden or rubber mallet rather than a metal hammer to avoid damaging the edges.
C. What's the ideal workspace setup for woodcarving?
-
Good lighting: Adequate lighting is essential for precise work. Use natural light or bright, cool-white LED lighting.
-
Stable workbench: Ensure your workbench is sturdy and at a comfortable height for carving. It should not wobble during use.
-
Safety gear: Wear safety glasses, hearing protection, and a dust mask or respirator to protect your eyes, ears, and lungs.
-
Tool organization: Keep your tools organized and easily accessible. Use tool racks or a wall-mounted toolboard.
-
Ventilation: If you're working indoors, ensure proper ventilation to disperse dust and fumes.
D. Can I carve wood without prior experience?
E. Where can I find quality carving wood?
-
Local lumberyards: Visit local lumberyards or woodworking stores, where you can often find a selection of carving wood.
-
Online suppliers: Numerous online suppliers specialize in selling carving wood. Look for reputable websites that offer a variety of wood species.
-
Fallen trees: If you have access to wooded areas, consider sourcing your wood from fallen trees. Make sure to obtain any necessary permits and follow local regulations.
-
Woodworking clubs: Joining a woodworking club or community can connect you with experienced carvers who may share or sell carving wood.
F. How can I turn my woodcarving hobby into a profession?
-
Skill development: Continue honing your carving skills to produce high-quality work.
-
Build a portfolio: Create a portfolio showcasing your best pieces to demonstrate your skills to potential clients.
-
Market yourself: Establish an online presence through a website or social media to showcase your work and reach a broader audience.
-
Networking: Attend craft fairs, art exhibitions, and woodworking events to network and connect with potential customers or galleries.
-
Pricing strategy: Determine fair pricing for your work that covers costs and provides a profit margin.
-
Legal considerations: Research local business regulations, licensing requirements, and tax obligations for selling your woodcarvings.
-
Customer service: Provide excellent customer service to build a reputation for reliability and quality.


